[1]:
from __future__ import print_function
Building a Custom Widget - Email widget
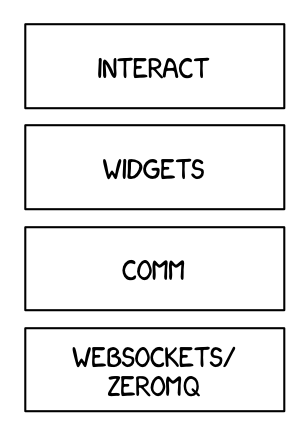
The widget framework is built on top of the Comm framework (short for communication). The Comm framework is a framework that allows the kernel to send/receive JSON messages to/from the front end (as seen below).
To create a custom widget, you need to define the widget both in the browser and in the python kernel.
Building a Custom Widget
To get started, you’ll create a simple email widget.
Python Kernel
DOMWidget and Widget
To define a widget, you must inherit from the Widget or DOMWidget base class. If you intend for your widget to be displayed in the Jupyter notebook, you’ll want to inherit from the DOMWidget. The DOMWidget class itself inherits from the Widget class. The Widget class is useful for cases in which the Widget is not meant to be displayed directly in the notebook, but instead as a child of another rendering environment. For example, if you wanted to create a three.js widget (a popular WebGL library), you would implement the rendering window as a DOMWidget and any 3D objects or lights meant to be rendered in that window as Widgets.
_view_name
Inheriting from the DOMWidget does not tell the widget framework what front end widget to associate with your back end widget.
Instead, you must tell it yourself by defining specially named trait attributes, _view_name, _view_module, and _view_module_version (as seen below) and optionally _model_name and _model_module.
[2]:
from traitlets import Unicode, Bool, validate, TraitError
from ipywidgets import DOMWidget, register


@register
class Email(DOMWidget):
    _view_name = Unicode('EmailView').tag(sync=True)
    _view_module = Unicode('email_widget').tag(sync=True)
    _view_module_version = Unicode('0.1.0').tag(sync=True)
sync=True traitlets
Traitlets is an IPython library for defining type-safe properties on configurable objects. For this tutorial you do not need to worry about the configurable piece of the traitlets machinery. The sync=True keyword argument tells the widget framework to handle synchronizing that value to the browser. Without sync=True, attributes of the widget won’t be synchronized with the front-end.
Other traitlet types
Unicode, used for _view_name, is not the only Traitlet type, there are many more some of which are listed below:
Any
Bool
Bytes
CBool
CBytes
CComplex
CFloat
CInt
CLong
CRegExp
CUnicode
CaselessStrEnum
Complex
Dict
DottedObjectName
Enum
Float
FunctionType
Instance
InstanceType
Int
List
Long
Set
TCPAddress
Tuple
Type
Unicode
Union
Not all of these traitlets can be synchronized across the network, only the JSON-able traits and Widget instances will be synchronized.
Front end (JavaScript)
Models and views
The IPython widget framework front end relies heavily on Backbone.js. Backbone.js is an MVC (model view controller) framework. Widgets defined in the back end are automatically synchronized with generic Backbone.js models in the front end. The traitlets are added to the front end instance automatically on first state push. The _view_name trait that you defined earlier is used by the widget framework to create the corresponding Backbone.js view and link that view
to the model.
Import @jupyter-widgets/base
You first need to import the @jupyter-widgets/base module. To import modules, use the define method of require.js (as seen below).
[3]:
%%javascript
define('email_widget', ["@jupyter-widgets/base"], function(widgets) {

});
Define the view
Next, define your widget view class. Inherit from the DOMWidgetView by using the .extend method.
[4]:
%%javascript
require.undef('email_widget');

define('email_widget', ["@jupyter-widgets/base"], function(widgets) {

    // Define the EmailView
    var EmailView = widgets.DOMWidgetView.extend({

    });

    return {
        EmailView: EmailView
    }
});
Render method
Lastly, override the base render method of the view to define custom rendering logic. A handle to the widget’s default DOM element can be acquired via this.el. The el property is the DOM element associated with the view.
[5]:
%%javascript
require.undef('email_widget');

define('email_widget', ["@jupyter-widgets/base"], function(widgets) {

    var EmailView = widgets.DOMWidgetView.extend({

        // Render the view.
        render: function() {
            this.email_input = document.createElement('input');
            this.email_input.type = 'email';
            this.email_input.value = 'example@example.com';
            this.email_input.disabled = true;

            this.el.appendChild(this.email_input);
        },
    });

    return {
        EmailView: EmailView
    };
});
Making the widget stateful
There is not much that you can do with the above example that you can’t do with the IPython display framework. To change this, you will make the widget stateful. Instead of displaying a static “example@example.com” email address, it will display an address set by the back end. First you need to add a traitlet in the back end. Use the name of value to stay consistent with the rest of the widget framework and to allow your widget to be used with interact.
We want to be able to avoid user to write an invalid email address, so we need a validator using traitlets.
[7]:
from traitlets import Unicode, Bool, validate, TraitError
from ipywidgets import DOMWidget, register


@register
class Email(DOMWidget):
    _view_name = Unicode('EmailView').tag(sync=True)
    _view_module = Unicode('email_widget').tag(sync=True)
    _view_module_version = Unicode('0.1.0').tag(sync=True)

    # Attributes
    value = Unicode('example@example.com', help="The email value.").tag(sync=True)
    disabled = Bool(False, help="Enable or disable user changes.").tag(sync=True)

    # Basic validator for the email value
    @validate('value')
    def _valid_value(self, proposal):
        if proposal['value'].count("@") != 1:
            raise TraitError('Invalid email value: it must contain an "@" character')
        if proposal['value'].count(".") == 0:
            raise TraitError('Invalid email value: it must contain at least one "." character')
        return proposal['value']
Accessing the model from the view
To access the model associated with a view instance, use the model property of the view. get and set methods are used to interact with the Backbone model. get is trivial, however you have to be careful when using set. After calling the model set you need call the view’s touch method. This associates the set operation with a particular view so output will be routed to the correct cell. The model also has an on method, which allows you to listen to events
triggered by the model (like value changes).
Rendering model contents
By replacing the string literal with a call to model.get, the view will now display the value of the back end upon display. However, it will not update itself to a new value when the value changes.
[8]:
%%javascript
require.undef('email_widget');

define('email_widget', ["@jupyter-widgets/base"], function(widgets) {

    var EmailView = widgets.DOMWidgetView.extend({

        // Render the view.
        render: function() {
            this.email_input = document.createElement('input');
            this.email_input.type = 'email';
            this.email_input.value = this.model.get('value');
            this.email_input.disabled = this.model.get('disabled');

            this.el.appendChild(this.email_input);
        },
    });

    return {
        EmailView: EmailView
    };
});
[9]:
Email(value='john.doe@domain.com', disabled=True)
Dynamic updates
To get the view to update itself dynamically, register a function to update the view’s value when the model’s value property changes. This can be done using the model.on method. The on method takes three parameters, an event name, callback handle, and callback context. The Backbone event named change will fire whenever the model changes. By appending :value to it, you tell Backbone to only listen to the change event of the value property (as seen below).
[10]:
%%javascript
require.undef('email_widget');

define('email_widget', ["@jupyter-widgets/base"], function(widgets) {

    var EmailView = widgets.DOMWidgetView.extend({

        // Render the view.
        render: function() {
            this.email_input = document.createElement('input');
            this.email_input.type = 'email';
            this.email_input.value = this.model.get('value');
            this.email_input.disabled = this.model.get('disabled');

            this.el.appendChild(this.email_input);

            // Python -> JavaScript update
            this.model.on('change:value', this.value_changed, this);
            this.model.on('change:disabled', this.disabled_changed, this);
        },

        value_changed: function() {
            this.email_input.value = this.model.get('value');
        },

        disabled_changed: function() {
            this.email_input.disabled = this.model.get('disabled');
        },
    });

    return {
        EmailView: EmailView
    };
});
This allows us to update the value from the Python kernel to the views. Now to get the value updated from the front-end to the Python kernel (when the input is not disabled) we can do it using the model.set method.
[11]:
%%javascript
require.undef('email_widget');

define('email_widget', ["@jupyter-widgets/base"], function(widgets) {

    var EmailView = widgets.DOMWidgetView.extend({

        // Render the view.
        render: function() {
            this.email_input = document.createElement('input');
            this.email_input.type = 'email';
            this.email_input.value = this.model.get('value');
            this.email_input.disabled = this.model.get('disabled');

            this.el.appendChild(this.email_input);

            // Python -> JavaScript update
            this.model.on('change:value', this.value_changed, this);
            this.model.on('change:disabled', this.disabled_changed, this);

            // JavaScript -> Python update
            this.email_input.onchange = this.input_changed.bind(this);
        },

        value_changed: function() {
            this.email_input.value = this.model.get('value');
        },

        disabled_changed: function() {
            this.email_input.disabled = this.model.get('disabled');
        },

        input_changed: function() {
            this.model.set('value', this.email_input.value);
            this.model.save_changes();
        },
    });

    return {
        EmailView: EmailView
    };
});
Test
[12]:
email = Email(value='john.doe@domain.com', disabled=False)
email
[13]:
email.value
[13]:
'john.doe@domain.com'
[14]:
email.value = 'jane.doe@domain.com'
More advanced uses: Packaging and distributing Jupyter widgets
A template project is available in the form of a cookie cutter: https://github.com/jupyter/widget-cookiecutter
This project is meant to help custom widget authors get started with the packaging and the distribution of Jupyter interactive widgets.
It produces a project for a Jupyter interactive widget library following the current best practices for using interactive widgets. An implementation for a placeholder “Hello World” widget is provided.