Building a Custom Widget - Email widget
This tutorial shows how to build a simple email widget using the TypeScript widget cookiecutter: https://github.com/jupyter-widgets/widget-ts-cookiecutter

Setup a dev environment
Install conda with miniconda
We recommend installing conda using miniconda.
Instructions are available on the conda installation documentation.
Create a new conda environment with the dependencies
Next create a conda environment that includes:
the latest release of JupyterLab or the classic notebook
cookiecutter: the tool you will use to bootstrap the custom widget
NodeJS: the JavaScript runtime you’ll use to compile the web assets (e.g., TypeScript, CSS) for the custom widget
To create the environment, execute the following command:
conda create -n ipyemail -c conda-forge jupyterlab jupyter-packaging cookiecutter nodejs yarn python
Then activate the environment with:
conda activate ipyemail
Create a new project
Build and install the widget for development
The generated project should already contain a README.md file with the instructions to develop the widget locally.
Since the widget contains a Python part, you need to install the package in editable mode:
python -m pip install -e .
You also need to enable the widget frontend extension.
If you are using JupyterLab 3.x:
# link your development version of the extension with JupyterLab
jupyter labextension develop . --overwrite

# rebuild extension Typescript source after making changes
yarn run build
It is also possible to rebuild the widget automatically when there is a new change, using the watch script:
# watch the source directory in one terminal, automatically rebuilding when needed
yarn run watch
If you are using JupyterLab 2.x, you will need to install the @jupyter-widgets/jupyterlab-manager extension manually:
# install the widget manager to display the widgets in JupyterLab
jupyter labextension install @jupyter-widgets/jupyterlab-manager --no-build

# install the local extension
jupyter labextension install .
If you are using the Classic Notebook:
jupyter nbextension install --sys-prefix --symlink --overwrite --py ipyemail
jupyter nbextension enable --sys-prefix --py ipyemail
Testing the installation
At this point, you should be able to open a notebook and create a new ExampleWidget.
To test it, execute the following in a terminal:
# if you are using the classic notebook
jupyter notebook

# if you are using JupyterLab
jupyter lab
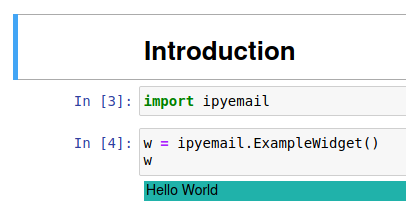
And open examples/introduction.ipynb.
By default, the widget displays the string Hello World with a colored background:
The next steps will walk you through how to modify the existing code to transform the widget into an email widget.
Implementing the widget
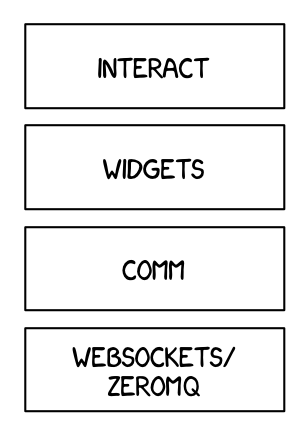
The widget framework is built on top of the Comm framework (short for communication). The Comm framework is a framework that allows the kernel to send/receive JSON messages to/from the front end (as seen below).
To learn more about how the underlying Widget protocol works, check out the Low Level Widget documentation.
To create a custom widget, you need to define the widget both in the browser and in the Python kernel.
Python Kernel
DOMWidget, ValueWidget and Widget
To define a widget, you must inherit from the DOMWidget, ValueWidget, or Widget base class. If you intend for your widget to be displayed, you’ll want to inherit from DOMWidget. If you intend for your widget to be used as an input for interact, you’ll want to inherit from ValueWidget. Your widget should inherit from ValueWidget if it has a single obvious output (for example, the output of an IntSlider is clearly the current value of the
slider).
Both the DOMWidget and ValueWidget classes inherit from the Widget class. The Widget class is useful for cases in which the widget is not meant to be displayed directly in the notebook, but instead as a child of another rendering environment. Here are some examples:
If you wanted to create a three.js widget (three.js is a popular WebGL library), you would implement the rendering window as a
DOMWidgetand any 3D objects or lights meant to be rendered in that window asWidgetIf you wanted to create a widget that displays directly in the notebook for usage with
interact(likeIntSlider), you should multiple inherit from bothDOMWidgetandValueWidget.If you wanted to create a widget that provides a value to
interactbut does not need to be displayed, you should inherit from onlyValueWidget
_view_name
Inheriting from the DOMWidget does not tell the widget framework what front end widget to associate with your back end widget.
Instead, you must tell it yourself by defining specially named trait attributes, _view_name, _view_module, and _view_module_version (as seen below) and optionally _model_name and _model_module.
First let’s rename ipyemail/example.py to ipyemail/widget.py.
In ipyemail/widget.py, replace the example code with the following:
from ipywidgets import DOMWidget, ValueWidget, register
from traitlets import Unicode, Bool, validate, TraitError

from ._frontend import module_name, module_version


@register
class Email(DOMWidget, ValueWidget):
    _model_name = Unicode('EmailModel').tag(sync=True)
    _model_module = Unicode(module_name).tag(sync=True)
    _model_module_version = Unicode(module_version).tag(sync=True)

    _view_name = Unicode('EmailView').tag(sync=True)
    _view_module = Unicode(module_name).tag(sync=True)
    _view_module_version = Unicode(module_version).tag(sync=True)

    value = Unicode('example@example.com').tag(sync=True)
In ipyemail/__init__.py, change the import from:
from .example import ExampleWidget
To:
from .widget import Email
sync=True traitlets
Traitlets is an IPython library for defining type-safe properties on configurable objects. For this tutorial you do not need to worry about the configurable piece of the traitlets machinery. The sync=True keyword argument tells the widget framework to handle synchronizing that value to the browser. Without sync=True, attributes of the widget won’t be synchronized with the front-end.
Syncing mutable types
Please keep in mind that mutable types will not necessarily be synced when they are modified. For example appending an element to a list will not cause the changes to sync. Instead a new list must be created and assigned to the trait for the changes to be synced.
An alternative would be to use a third-party library such as spectate, which tracks changes to mutable data types.
Other traitlet types
Unicode, used for _view_name, is not the only Traitlet type, there are many more some of which are listed below:
Any
Bool
Bytes
CBool
CBytes
CComplex
CFloat
CInt
CLong
CRegExp
CUnicode
CaselessStrEnum
Complex
Dict
DottedObjectName
Enum
Float
FunctionType
Instance
InstanceType
Int
List
Long
Set
TCPAddress
Tuple
Type
Unicode
Union
Not all of these traitlets can be synchronized across the network, only the JSON-able traits and Widget instances will be synchronized.
Front end (TypeScript)
Models and views
The IPython widget framework front end relies heavily on Backbone.js. Backbone.js is an MVC (model view controller) framework. Widgets defined in the back end are automatically synchronized with Backbone.js Model in the front end. Each front end Model handles the widget data and state, and can have any number of associate Views. In the context of a widget the Views are what render objects for the user to interact with, and the Model handles
communication with the Python objects.
On the first state push from python the synced traitlets are added automatically. The _view_name trait that you defined earlier is used by the widget framework to create the corresponding Backbone.js view and link that view to the model.
The TypeScript cookiecutter generates a file src/widget.ts. Open the file and rename ExampleModel to EmailModel and ExampleView to EmailView:
export class EmailModel extends DOMWidgetModel {
  defaults() {
    return {...super.defaults(),
      _model_name: EmailModel.model_name,
      _model_module: EmailModel.model_module,
      _model_module_version: EmailModel.model_module_version,
      _view_name: EmailModel.view_name,
      _view_module: EmailModel.view_module,
      _view_module_version: EmailModel.view_module_version,
      value : 'Hello World'
    };
  }

  static serializers: ISerializers = {
      ...DOMWidgetModel.serializers,
      // Add any extra serializers here
    }

  static model_name = 'EmailModel';
  static model_module = MODULE_NAME;
  static model_module_version = MODULE_VERSION;
  static view_name = 'EmailView';
  static view_module = MODULE_NAME;
  static view_module_version = MODULE_VERSION;
}


export class EmailView extends DOMWidgetView {
  render() {
    this.el.classList.add('custom-widget');

    this.value_changed();
    this.model.on('change:value', this.value_changed, this);
  }

  value_changed() {
    this.el.textContent = this.model.get('value');
  }
}
Render method
Now, override the base render method of the view to define custom rendering logic.
A handle to the widget’s default DOM element can be acquired via this.el. The el property is the DOM element associated with the view.
In src/widget.ts, define the _emailInput attribute:
export class EmailView extends DOMWidgetView {
  private _emailInput: HTMLInputElement;

  render() {
     // .....
  }

  // .....
}
Then, add the following logic for the render method:
render() {
    this._emailInput = document.createElement('input');
    this._emailInput.type = 'email';
    this._emailInput.value = 'example@example.com';
    this._emailInput.disabled = true;
    this.el.appendChild(this._emailInput);

    this.el.classList.add('custom-widget');

    this.value_changed();
    this.model.on('change:value', this.value_changed, this);
},
Test
First, run the following command to recreate the frontend bundle:
npm run build
If you use JupyterLab, you might want to use jlpm as the npm client. jlpm uses yarn under the hood as the package manager. The main difference compared to npm is that jlpm will generate a yarn.lock file for the dependencies, instead of package-lock.json. With jlpm the command is:
jlpm run build
After reloading the page, you should be able to display your widget just like any other widget now:
from ipyemail import Email

Email()
Making the widget stateful
There is not much that you can do with the above example that you can’t do with the IPython display framework. To change this, you will make the widget stateful. Instead of displaying a static “example@example.com” email address, it will display an address set by the back end. First you need to add a traitlet in the back end. Use the name of value to stay consistent with the rest of the widget framework and to allow your widget to be used with interact.
We want to be able to avoid the user to write an invalid email address, so we need a validator using traitlets.
from ipywidgets import DOMWidget, ValueWidget, register
from traitlets import Unicode, Bool, validate, TraitError

from ._frontend import module_name, module_version


@register
class Email(DOMWidget, ValueWidget):
    _model_name = Unicode('EmailModel').tag(sync=True)
    _model_module = Unicode(module_name).tag(sync=True)
    _model_module_version = Unicode(module_version).tag(sync=True)

    _view_name = Unicode('EmailView').tag(sync=True)
    _view_module = Unicode(module_name).tag(sync=True)
    _view_module_version = Unicode(module_version).tag(sync=True)

    value = Unicode('example@example.com').tag(sync=True)
    disabled = Bool(False, help="Enable or disable user changes.").tag(sync=True)

    # Basic validator for the email value
    @validate('value')
    def _valid_value(self, proposal):
        if proposal['value'].count("@") != 1:
            raise TraitError('Invalid email value: it must contain an "@" character')
        if proposal['value'].count(".") == 0:
            raise TraitError('Invalid email value: it must contain at least one "." character')
        return proposal['value']
Accessing the model from the view
To access the model associated with a view instance, use the model property of the view. get and set methods are used to interact with the Backbone model. get is trivial, however you have to be careful when using set. After calling the model set you need call the view’s touch method. This associates the set operation with a particular view so output will be routed to the correct cell. The model also has an on method, which allows you to listen to events
triggered by the model (like value changes).
Rendering model contents
By replacing the string literal with a call to model.get, the view will now display the value of the back end upon display. However, it will not update itself to a new value when the value changes.
export class EmailView extends DOMWidgetView {
  render() {
    this._emailInput = document.createElement('input');
    this._emailInput.type = 'email';
    this._emailInput.value = this.model.get('value');
    this._emailInput.disabled = this.model.get('disabled');

    this.el.appendChild(this._emailInput);
  }

  private _emailInput: HTMLInputElement;
}
Dynamic updates
To get the view to update itself dynamically, register a function to update the view’s value when the model’s value property changes. This can be done using the model.on method. The on method takes three parameters, an event name, callback handle, and callback context. The Backbone event named change will fire whenever the model changes. By appending :value to it, you tell Backbone to only listen to the change event of the value property (as seen below).
export class EmailView extends DOMWidgetView {
  render() {
    this._emailInput = document.createElement('input');
    this._emailInput.type = 'email';
    this._emailInput.value = this.model.get('value');
    this._emailInput.disabled = this.model.get('disabled');

    this.el.appendChild(this._emailInput);

    // Python -> JavaScript update
    this.model.on('change:value', this._onValueChanged, this);
    this.model.on('change:disabled', this._onDisabledChanged, this);
  }

  private _onValueChanged() {
    this._emailInput.value = this.model.get('value');
  }

  private _onDisabledChanged() {
    this._emailInput.disabled = this.model.get('disabled');
  }

  private _emailInput: HTMLInputElement;
}
This allows us to update the value from the Python kernel to the views. Now to get the value updated from the front-end to the Python kernel (when the input is not disabled) we set the value on the frontend model using model.set and then sync the frontend model with the Python object using model.save_changes.
export class EmailView extends DOMWidgetView {
  render() {
    this._emailInput = document.createElement('input');
    this._emailInput.type = 'email';
    this._emailInput.value = this.model.get('value');
    this._emailInput.disabled = this.model.get('disabled');

    this.el.appendChild(this._emailInput);

    // Python -> JavaScript update
    this.model.on('change:value', this._onValueChanged, this);
    this.model.on('change:disabled', this._onDisabledChanged, this);

    // JavaScript -> Python update
    this._emailInput.onchange = this._onInputChanged.bind(this);
  }

  private _onValueChanged() {
    this._emailInput.value = this.model.get('value');
  }

  private _onDisabledChanged() {
    this._emailInput.disabled = this.model.get('disabled');
  }

  private _onInputChanged() {
    this.model.set('value', this._emailInput.value);
    this.model.save_changes();
  }

  private _emailInput: HTMLInputElement;
}
Test
To instantiate a new widget:
email = Email(value='john.doe@domain.com', disabled=False)
email
To get the value of the widget:
email.value
To set the value of the widget:
email.value = 'jane.doe@domain.com'
The end result should look like the following:
Passing URLs
In the example above we have seen how to pass simple unicode strings to a HTML input element. However, certain HTML elements, like e.g. <img/>, <iframe/> or <script/> require URLs as input. Consider a widget embedding an <iframe/>. The widget has a src property that is connected to the src attribute of the <iframe/>. It is the ipywidget version of the built-in IPython.display.IFrame(...). Like the built-in we’d like to support two forms:
from ipyiframe import IFrame

remote_url = IFrame(src='https://jupyter.org') # full HTTP URL
local_file = IFrame(src='./local_file.html')   # local file
Note, that the second form is a path relative to the notebook file. Using this string as the src attribute of the <iframe/> is not going to work, because the browser will interpret it as a relative URL, relative to the browsers address bar. To transform the relative path into a valid file URL we use the utility funtion resolveUrl(...) in our javascript view class:
export class IFrameView extends DOMWidgetView {
  render() {
    this.$iframe = document.createElement('iframe');
    this.el.appendChild(this.$iframe);
    this.src_changed();
    this.model.on('change:src', this.src_changed, this);
  }

  src_changed() {
    const url = this.model.get('src');
    this.model.widget_manager.resolveUrl(url).then(resolvedUrl => {
        this.$iframe.src = resolvedUrl;
    });
  }
}
Invoking this.model.widget_manager.resolveUrl(...) returns a promise that resolves to the correct URL.
Learn more
As we have seen in this tutorial, starting from a cookiecutter project is really useful to quickly prototype a custom widget.
Two cookiecutter projects are currently available:
widget-ts-cookiecutter: To create a custom widget in TypeScript
widget-cookiecutter: To create a custom widget in JavaScript
If you want to learn more about building custom widgets, you can also check out the rich ecosystem of third-party widgets: